|

|
|
|
In some circumstances, signs or indicators may exist to mark the location of points or to inform drivers that they are properly set for the intended train movement.
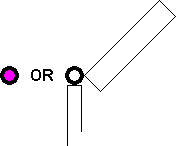
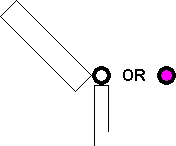
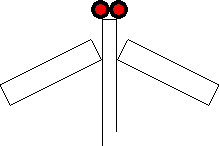
The first mechanical signal of any description on the Great Western Railway was brought into use in 1839 at Maidenhead. I K Brunel had designed a 'capstan' to indicate to drivers the position of facing points in the running line. When the points were set for straight running, a disc was displayed to drivers [11.1]. When the points were set for a divergence, the disc was turned edge on such that it was no longer visible. Also in 1839, a very similar points indicator was provided at Corbett's Lane Junction, the junction between the London & Croydon and London & Greenwich railways. When the points were set for the Croydon line, the disc was displayed, along with a red light at night. When the points were set for the Greenwich line, the disc was turned edge on and showed a white light at night [11.2].
 |
 |
|
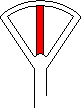
[11.1] Points Indicator - Points set for straight route.
Area: GWR Usage: Low Status: Historical |
[11.2] Points Indicator - Points set for diverging route.
Area: Various Usage: Low Status: Historical |
|---|
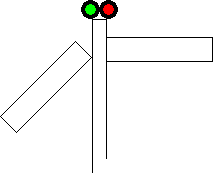
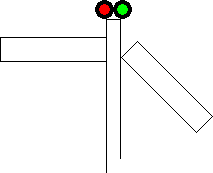
In 1862, J J Stevens patented a quadrant-type points indicator that comprised a pivoted arm, which was inclined to one side to indicate the lie of the points. The arm lay to the same side as the direction that the train would take at the points [11.3 & 11.4]. The arm stood upright in an intermediate position when the points were incorrectly set [11.5]. The indicator was later provided with a lamp, which showed a white light when the points were set for the main line and a green light when they were set for the branch line [11.6 & 11.7]. A red light was shown when the points were not correctly set [11.8]. These indicators were used at points that were located some distance away from the lever that operated them.
 |
 |
 |
|
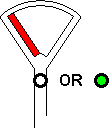
[11.3] Stevens Points Indicator - Points set to left.
Area: Various Usage: Unknown Status: Historical |
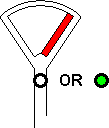
[11.4] Stevens Points Indicator - Points set to right.
Area: Various Usage: Unknown Status: Historical |
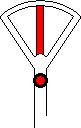
[11.5] Stevens Points Indicator - Points incorrectly set.
Area: Various Usage: Unknown Status: Historical |
|---|---|---|
 |
 |
 |
|
[11.6] Stevens Points Indicator - Points set to left.
Area: Various Usage: Unknown Status: Historical |
[11.7] Stevens Points Indicator - Points set to right.
Area: Various Usage: Unknown Status: Historical |
[11.8] Stevens Points Indicator - Points incorrectly set.
Area: Various Usage: Unknown Status: Historical |
A points indicator was provided c.1870 at High Carr on the Talk o' th' Hill branch, and this was similar to the Stevens type except that the arm lay to the opposite side from the direction the train would take [11.9 & 11.10]. A white light or a purple light was shown at night. The arm stood upright when the points were incorrectly set [11.11]. This points indicator remained in use until closure of the line in 1931.
 |
 |
 |
|
[11.9] Points Indicator - Points set to left.
Area: High Carr Usage: Low Status: Historical |
[11.10] Points Indicator - Points set to right.
Area: High Carr Usage: Low Status: Historical |
[11.11] Points Indicator - Points incorrectly set.
Area: High Carr Usage: Low Status: Historical |
|---|
Saxby developed the points indicator into one that had two arms and two lamps. The arm was inclined downwards on the same side as the direction of movement for which the points were set [11.12 & 11.13]. When the points were not correctly set, both arms were inclined downwards [11.14].
 |
 |
 |
|
[11.12] Saxby Points Indicator - Points set to left.
Area: Various Usage: Unknown Status: Historical |
[11.13] Saxby Points Indicator - Points set to right.
Area: Various Usage: Unknown Status: Historical |
[11.14] Saxby Points Indicator - Points incorrectly set.
Area: Various Usage: Unknown Status: Historical |
|---|
Because the arms of the original Saxby points indicators were liable to be mistaken for semaphore signals, a miniature version was developed. A letter painted on each arm indicated the route to which it applied [11.15 - 11.17].
 |
 |
 |
|
[11.15] Points Indicator - Points set to left (e.g. Main).
Area: Various Usage: Unknown Status: Historical |
[11.16] Points Indicator - Points set to right (e.g. Loop).
Area: Various Usage: Unknown Status: Historical |
[11.17] Points Indicator - Points incorrectly set.
Area: Various Usage: Unknown Status: Historical |
|---|
Points indicators were later provided only for shunting movements and took the form of revolving discs mounted at ground level [11.18 - 11.22]. Generally, this form of points indicator displayed a red disc and light [11.18] when the relevant points were set for the main line, or in the case of trap points, set to derail. When the points were set the other way, the disc was rotated out of view and a white light was shown at night [11.19]. Points indicators on the Hull & Barnsley Railway showed a blue disc and light [11.20] instead of red. Some points indicators on the Great Western Railway were fitted with red and green targets [11.21 & 11.22].
 |
 |
 |
|
[11.18] Points Indicator.
Area: Various Usage: High Status: Historical |
[11.19] Points Indicator.
Area: Various Usage: High Status: Historical |
[11.20] Points Indicator.
Area: H&BR Usage: High Status: Historical |
|---|
 |
 |
|
[11.21] Points Indicator.
Area: GWR Usage: High Status: Historical |
[11.22] Points Indicator.
Area: GWR Usage: High Status: Historical |
|---|
Eventually, the discs came to be worked independently of the points and as such were treated as signals in their own right (see Section 4). Points indicators gradually disappeared from the scene, although a few examples survived into the 1980s.
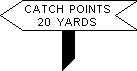
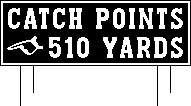
Before all goods trains had been fitted with continuous automatic brakes, it was common practice to install catch points on running lines, below steep rising gradients. The point switches were usually held in the derailing position by a spring, to arrest any vehicle running back in the wrong direction. Signs were often provided at the lineside to mark the location of catch points, generally comprising a simple worded notice board opposite the points. The Barry Railway used an arrow-shaped board bearing the words "catch points" and the distance to the points [11.23]. On the Great Northern Railway, the signs had just the word "switch" [11.24], while most companies' signs had the words "catch points" [11.25 & 11.26]. On the Great Western Railway, a large sign was placed on the approach to catch points, stating the distance to the points [11.27]. These signs were fixed on the skew, so as to be visible to drivers of approaching trains.
 |
 |
 |
|
[11.23] Catch Points Sign.
Area: Bar.R Usage: Medium Status: Historical |
[11.24] "Switch" Sign.
Area: GNR Usage: Medium Status: Historical |
[11.25] "Catch Points" Sign.
Area: Various Usage: High Status: Obsolescent |
|---|
 |
 |
|
[11.26] "Catch Points" Sign.
Area: LMS Usage: Medium Status: Obsolescent |
[11.27] Catch Points Warning Board.
Area: GWR Usage: High Status: Historical |
|---|
|
On the North Eastern Region, a red marker post [11.28] was sometimes installed as a fouling point marker. An alternative use for a red marker post on the North Eastern Region, in the 1960s, was to mark the position of a set of points upon their conversion to hand operation. |
|
|
|