|

|
|
|
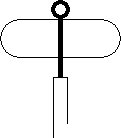
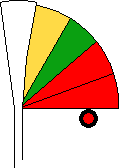
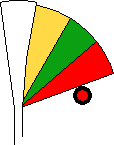
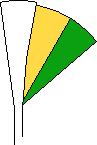
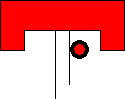
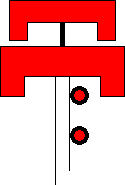
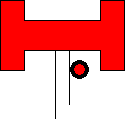
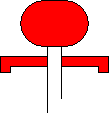
The manager of the Eastern Counties Railway, Richard Hall, had devised an elaborate form of signal, which he considered to be superior to any type previously in use. Known as 'panel signals' or 'fan signals', they were erected along the length of the railway between Shoreditch and Brentwood in 1842. Each signal had four coloured panels, which were capable of being hidden from view one at a time [1.44 - 1.48]. All four panels were displayed for a duration of five minutes after the passage of a train [1.44]. This indicated 'danger', and any following train was instructed to stop at a green post [1.49] fixed 100 yards (91 metres) on the approach to the signal. Five minutes after a train had passed, the lower of the two red panels was withdrawn, indicating 'stop' [1.45]. No train was permitted to pass more than 100 yards (91 metres) beyond a signal showing 'stop'. After a further two and a half minutes had elapsed, the second red panel was withdrawn [1.46]. This was the preliminary 'caution' indication, which required drivers to reduce speed to 15 mph (or 10 mph in fog) until having passed a post painted with green and white stripes [1.50], which was placed one mile (1.6 km) beyond the signal. The green panel was withdrawn after a further period of two and a half minutes, indicating reduced 'caution' [1.47]. Speed was to be restricted to 24 mph (or 15 mph in fog). Finally, some twelve and a half minutes after the passage of a train, the yellow panel was hidden and a 'clear' indication was shown [1.48]. During hours of darkness, the signals were fitted with a lamp, which was visible only when displaying 'danger' or 'stop' [1.44 & 1.45].
 |
 |
|
[1.44] Panel Signal showing 'Danger'.
Area: ECR Usage: Unknown Status: Historical |
[1.45] Panel Signal showing 'Stop'.
Area: ECR Usage: Unknown Status: Historical |
|---|
 |
 |
 |
|
[1.46] Panel Signal showing 'Preliminary Caution'.
Area: ECR Usage: Unknown Status: Historical |
[1.47] Panel Signal showing 'Reduced Caution'.
Area: ECR Usage: Unknown Status: Historical |
[1.48] Panel Signal showing 'Clear'.
Area: ECR Usage: Unknown Status: Historical |
|---|
 |
|
|
[1.49] Green Post.
Area: ECR Usage: Unknown Status: Historical |
[1.50] Post with Green and White Stripes.
Area: ECR Usage: Unknown Status: Historical |
|---|
To protect a train from rear-end collision while stationary at a 'danger' signal, 'auxiliary signals' came to be provided some distance on the approach. These signals were first used on the Hawick branch (North British Railway), in 1846. The auxiliary signals were often identical in appearance to the stop signals, and drivers were expected to make every effort to stop at them if they were showing 'danger', before drawing up to the stop signal ahead. Auxiliary signals were the forerunner of the 'distant signal'.
When a Great Western Railway disc and crossbar signal was at 'danger' (see [1.32 & 1.34]), it could sometimes be difficult for a driver to tell if the crossbar applied to the line his train was running on or to the adjacent line. To resolve this deficiency, in 1852, all the signals for the Down line had downward pointing lugs added to their crossbars [1.51 & 1.52]. No modification was made to the Up line signals. Signals that applied to both tracks (those that protected level crossings) were fitted with lugs pointing up and down [1.53].
 |
 |
 |
|
[1.51] Disc and Crossbar Signal showing 'Danger' (applicable to Down line).
Area: GWR Usage: Unknown Status: Historical |
[1.52] Double Disc and Crossbar Signal showing 'Danger' (applicable to Down line).
Area: GWR Usage: Unknown Status: Historical |
[1.53] Disc and Crossbar Signal showing 'Danger' (applicable to both lines).
Area: GWR Usage: Unknown Status: Historical |
|---|
The Great Western Railway installed its first auxiliary signals in 1852.
Some of the London & North Western Railway's disc signals were later fitted with a crossbar, the purpose of which was to indicate to which line the signal applied. When the signal showed 'danger', the crossbar was visible underneath the disc. The crossbar had projections at the ends, which pointed downwards for Down line signals [1.54] or upwards in the case of Up line signals [1.55]. The LNWR signals' crossbars therefore served a different purpose from those on the Great Western Railway's 'disc and crossbar' signals (see [1.32 & 1.33]). When the LNWR signal was cleared, both the disc and the crossbar were turned edge on so as to be practically invisible to drivers. The crossbars were only added to signals south of Birmingham.
 |
 |
|
[1.54] Disc Signal showing 'Danger' (applicable to Down line).
Area: LNWR Usage: Unknown Status: Historical |
[1.55] Disc Signal showing 'Danger' (applicable to Up line).
Area: LNWR Usage: Unknown Status: Historical |
|---|
|
Board signals on the York & North Midland Railway were shaped with one side of the board lower than the other [1.56] so that drivers could tell in poor light if the board applied to their train. When the lower part was on the left, it indicated 'danger' to an approaching train. |
|
The second type of vane signal on the Glasgow & South Western Railway, in use by 1856, was a three-faced signal. The G&SWR was the first company to use a three-faced signal. The signal showed a single green vane for 'caution' [1.57] and a white vane for 'clear' [1.58]. The 'danger' indication was two red vanes, the same as with the previous signals (see [1.19]).
 |
 |
|
[1.57] Vane Signal showing 'Caution'.
Area: G&SWR Usage: Unknown Status: Historical |
[1.58] Vane Signal showing 'Clear'.
Area: G&SWR Usage: Unknown Status: Historical |
|---|
The Glasgow & South Western Railway altered its vane signals in 1856. Diagonal white lines were painted across the red and green vanes [1.59 & 1.60]. The white vane and light (see [1.58]) would now indicate 'caution' and the vane with green and white diagonal lines (green light at night) [1.60] indicated 'clear'.
|
|
|
[1.59] Double Vane Signal showing 'Danger'.
Area: G&SWR Usage: Unknown Status: Historical |
[1.60] Vane Signal showing 'Clear'.
Area: G&SWR Usage: Unknown Status: Historical |
|---|
|
Bouch designed the 'butterfly' vane signal for the Stockton & Darlington Railway. As well as the usual red vanes for the 'danger' indication (see [1.9]), the signal was equipped to show a positive 'clear' indication by means of white vanes [1.61]. These signals were used on the Darlington & Barnard Castle Railway c.1860. The vanes for the 'clear' indication had been experimentally painted both green and white. |
|
|
|